

How to manually connect your Amazon S3 account to WPTC more securely
Recently, we have changed the connection method of WPTC plugin with Amazon S3 bucket to make it more secure than ever.
In this process, we implemented a feature on which S3 users are created automatically. Check this link to know how it's done.
Few users didn't like the option as they don't want to give full access to the WPTC plugin, and they want to create the users manually.
So, now, we have added an option to create the S3 users manually.
Note: You need to follow the below steps every time you add a new site to your account.
- Log in to your Amazon Web Services console - https://console.aws.amazon.com/console/home
- Click on your username which you can find it in the top right corner of your page. Click on Security Credentials in the drop-down

- Click on Get Started with IAM Users button in the dialog that appears.

- Click on the user whose access key you want to use. You can also create a new user by clicking on the "Add another user" button.
(You must create a new user for every site to make it more secure).
- If you are creating the new user, please enter a username with prefix WPTC so that you can easily recognize your WPTC users in future.
Choose Access Type as Programmatic access. Click Next: Permissions button.
- Click Attach existing policies directly -> Create Policy.

- A new tab will be opened. Click on JSON tab -> Paste the following policy in there (https://gist.github.com/thamaraiselvam/e801768027ded18ff9fe41fc938b78af)
Don't forget to change the YOUR_BUCKET_NAME and SITE_NAME in the policy. You can see the SITE_NAME on Cloud connection page of WPTC.


The policy will be created now. Please close the current tab.
Now click the refresh button and select the created policy on the list.
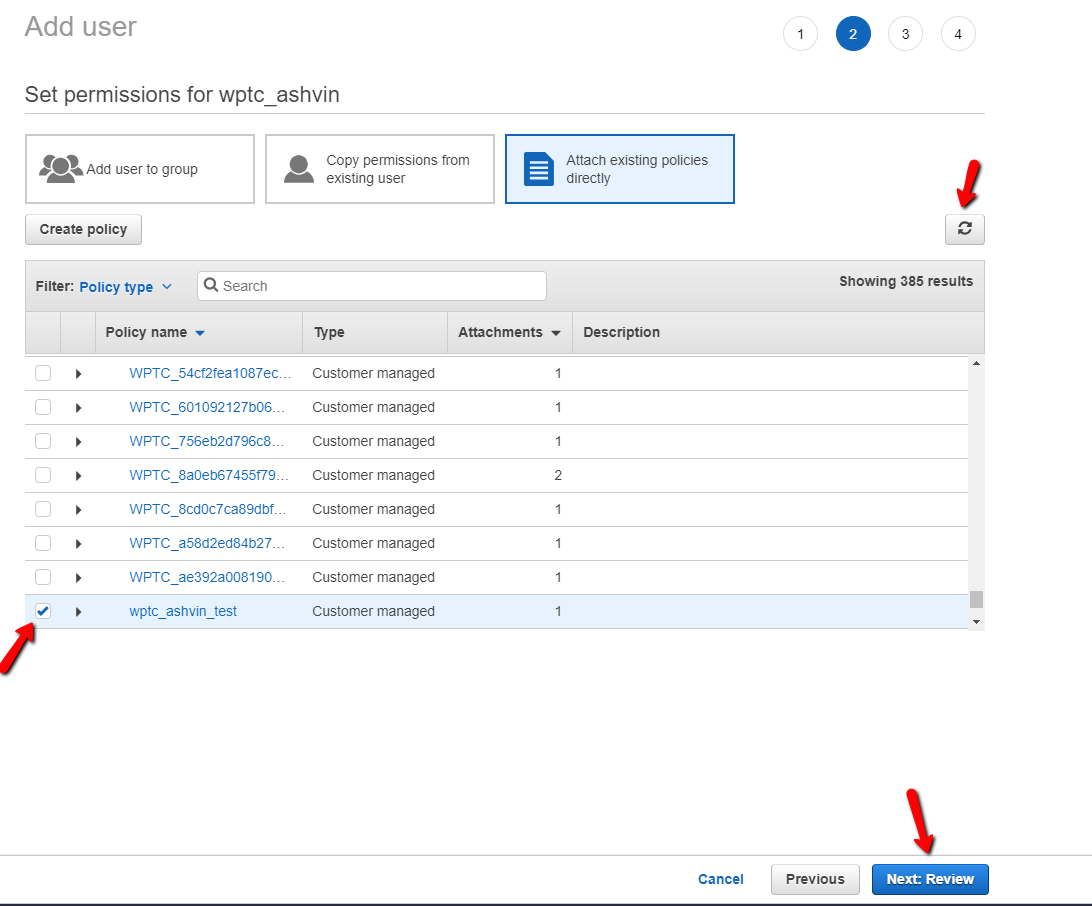
Click Next: Review and Hit Create User. A new user will be created with Access Key ID and Secret Access Key.
If you do not see the Access Key ID and Secret access key, please follow the instructions below to create Access Key for your IAM user.
- Open the Security Credentials tab. Then, click Create Access Key.

- Then click Show to see the Secret Access Key.

- Copy the Access Key ID and the Secret access key and paste it into WP Time Capsule settings page.

- Select Bucket region you want and enter the bucket name, You must create the bucket manually and Enable versioning for that bucket.
As always, if you have any questions, write an email to help@wptimecapsule.com, and we'll get back to you ASAP.